|

|
65th (2nd Yorkshire North Riding) Regiment of Foot
|

|
Jump to: [ Home Page | Drill
TOC ]
Drill on this page [The Shoulder |
The Secure |
The Shoulder from the Secure | The Order | Fixing Bayonets
The Shoulder from the Order |
The Present | The Shoulder from the Present | The Port | The Charge ]

S. 1. Manual Exercise with the Long Rifle, in Single
Rank
1. By Numbers
I
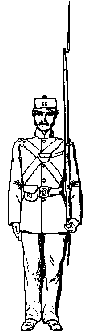
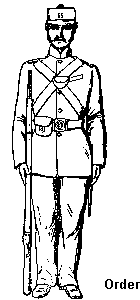
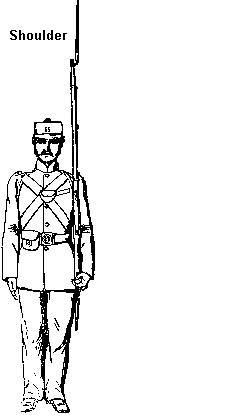
The recruit will first fall in as directed in Part
1., Section 24; the rifle will then be placed in his left hand, which will
grasp the inside of the butt with:
- the first two joints of the fingers,
- the forefinger being half an inch from the heel,
- the thumb in front of the heel, the wrist slightly turned out, and
- the fingers resting slightly against the thigh.
The rifle will rest against the hollow of the left shoulder, the fore part
of the butt nearly even with the front of the thigh.
When the rifle has been properly placed at "The Shoulder," the recruit will
be instructed always to fall in on parade or for drill with it in that position.
(For the protection of the rifle in wet weather.)
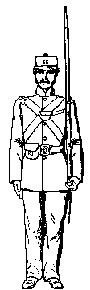
|
Secure-Arms.
|
|
- Turn the lock to the front,
- and seize the rifle with the right hand under the guard, without moving
it from the shoulder;
- thumb and fingers round the stock,
- arm close to the body.
|
|
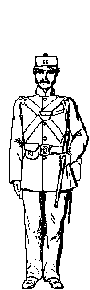
Two.
|
|
- Without moving the rifle from the shoulder, turn it, with the right
hand, so as to bring the sling to the front, and the cock close to the
body,
- at the same time seize it with the left hand, little finger as high
as the shoulder,
- the left arm to be close to the rifle.
|
|
Three.
|
|
- With the fingers of the right hand, give the butt a cant under the
left arm,
- then drop the right hand to the side;
- the cock to be close up under the armpit,
- the barrel slanting downwards, and inclining to the right front;
- the rifle to be firmly grasped with the left hand, which is to be
in front of, but rather lower than, the hip,
- left elbow a little to the rear.
|
When standing at ease with arms at "The Secure," the right hand is
to grasp the rifle above the lower band, the sling or stock to rest on the left
arm, and the left hand to lay hold of the right arm close above the wrist.
|
Shoulder-Arms
|
|
- Bring the rifle to the perpendicular.
- and seize the rifle with the right hand under the guard.
|
|
Two
|
|
- Without moving the rifle from the shoulder, turn it, with the right
hand, so as to bring the barrel to the front.
- Drop the left hand and grasp the inside of the butt with the first
two joints of the fingers; the forefinger half an inch from, the thumb
in front of, the heel, the wrist slightly turned out, the fingers to
rest lightly against the thigh, with the elbow slightly bent.
|
|
Three
|
|
- Drop the right hand to the side.
|
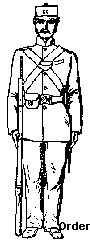
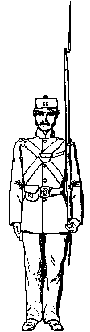
Rifle placed perpendicularly at the right side, butt on the ground, its toe
in line with the toe of the right foot; right hand placed flat on the outside
of the stock, thumb on the sling, the barrel pressed to the hollow of the shoulder.
|
Fix
|
|
- By a sharp turn of the wrist, bring the
thumb of the right hand round the rear of the barrel and grasp the rifle,
thumb between the stock and the thigh
- At the same time seize the socket of the
bayonet with the left hand, knuckles to the front, thumb to the rear,
fingers pointing to the ground, left elbow to the rear.
|
|
Bayonets
|
|
- Push the muzzle of the rifle a little forward
- At the same time draw the bayonet
- As soon as the point clears the scabbard turn it up, keeping the elbow
down and the upper part of the arm close to the body.
- Place socket of bayonet on the muzzle (flat part of the blade to the
front)
- When it falls on the block of the foresight, turn it with the thumb
from left to right and press it home
- With the thumb turn the locking ring in the same direction under the
block of the foresight
- Drop the left hand to the side and bring the rifle to the Order.
|
|
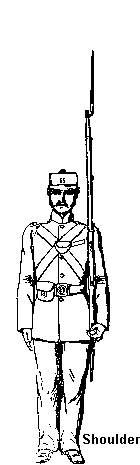
Shoulder
|
|
- By a sharp turn of the wrist, bring the
thumb of the right hand round the rear of the barrel and grasp the rifle,
thumb between the stock and the thigh.
|
|
Arms
|
|
- Give the rifle a cant upwards with the
right hand and seize it below the lower band, keeping the barrel close
to the shoulder.
|
|
Two
|
|
- Bring the rifle with the right hand to
the left side.
- Seize rifle with the left hand, grasping
the inside of the butt with the first two joints of the fingers; the
forefinger half an inch from, the thumb in front of, the heel, the wrist
slightly turned out, the fingers to rest lightly against the thigh.
The rifle to rest against the hollow of the left shoulder, the fore
part of the butt nearly even with the front of the thigh.
- As the left hand seizes the rifle, drop
the right to the side.
|
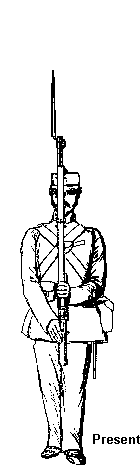
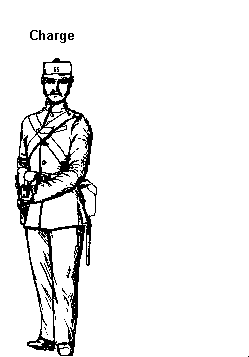
VII. The Present
Present-Arms |
|
- Turn the lock to the front and seize the rifle with the right hand under the guard without moving it from the shoulder
- Thumb and fingers round the stock, arm close to the body
|
Two |
|
- Without moving the head, raise the rifle with the right hand perpendicularly in front of the centre of the body
- Place the left hand smartly on the sling, the wrist on the trigger-guard, the fingers pointing upwards, the thumb close to the fore finger (its point in line with the mouth), the right elbow to be close to the butt, the right elbow and butt close to the body.
|
Three |
|
- Bring the rifle down close in front of the centre of the body, sling to the front, as low as the right hand will admit without constraint
- Grasp it with the left hand, the little finger touching the projection above the lock plate, thumb between stock and barrel
- Right hand lightly holding the small of the butt, fingers slanting downwards
- At the same time place the hollow of the right foot against the left heel, both knees straight.
- The weight of the rifle supported by the left hand.
|
Shoulder - Arms |
|
- By a turn of the right wrist, bring the rifle to the left side and seize it with the left hand, grasping the inside of the butt with the first two joints of the fingers; the forefinger half an inch from, the thumb in front of, the heel,
the wrist slightly turned out, the fingers to rest lightly against the thigh. The rifle to rest against the hollow of the left shoulder, the fore part of the butt nearly even with the front of the thigh.
- Fingers of the right hand to remain under the hammer (first two joints round the stock), thumb between the stock and the barrel, arm close to the body,
- At the same time bring the right foot to its original position.
|
Two |
|
- Drop the right hand to the side.
|
Port - Arms |
|
- Seize the small of the butt with the right hand, arm close to the body.
|
Two |
|
- Bring the rifle to a slanting position in front of the body, lock to the front, barrel crossing opposite the point of the left shoulder
- Meet it at the same time with the left hand immediately below the lower band, thumb and fingers round the rifle; left wrist opposite the left breast, both elbows close to the body.
|
Port - Arms |
|
- Seize the small of the butt with the right hand, arm close to the body.
|
Two |
|
- Bring the rifle to a slanting position in front of the body, lock to the front, barrel crossing opposite the point of the left shoulder.
- Meet it at the same time with the left hand immediately below the lower band, thumb and fingers round the rifle; left wrist opposite the left breast, both elbows close to the body.
|
Updated 24 Sept,
2004}

